DIY Wedding Flowers - a workshop recap

As mentioned in my last post, I am looking forward to a great season of growing AND an expanded workshop and speaking schedule. I'm totally psyched!  Today was a fabulous day for my first DIY Wedding Flowers workshop for 2016.  Two more are scheduled - one in June and one in September. Please see the Current Workshops page of this website to learn more and sign up. 

Beautiful bouquets put together by some beautiful gals.

Beautiful bouquets put together by some beautiful gals.

You don't necessarily have to be a future bride to participate. Anyone interested in design is more than welcome.  Helping get you started is extremely rewarding and fun for me, whether you are soon to be married, are soon to be starting your own design business, or are simply seeking an educational and therapeutic afternoon with the flowers. Today, I think we covered it all, from flowers, to budget, to scheduling and design. I'd say we really crushed it! Hugs!

Winter Summary

PerennialGardening.jpg

Phlox in the gardens. This year I am branching out a bit more and will offer a nice selection of gardening workshops as well as floral design workshops. 

All in a winter's time-- so much goes on in the offseason around here, it is hardly just to call it an offseason. Starting with the basics, there is seed purchase, creation of planting plans, accounting roundup (who doesn't want to do this one) photo organization and, of course, overall business review and evaluation.

This winter, I have taken a very deep and thorough inventory of myself, as well as the operations of Butternut Gardens, and I am setting a few new and different priorities as a result. I will share with you Revalation #1 here and the first change coming to my operations.  Check back for future posts to see what other exciting and new directions in which I am choosing to go.

Revalation #1

So many times over the years I have been asked to teach others about gardening and basic landscape design as well as floral design. It stands to reason that as a flower farmer I might know a little about growing plants. I have, in fact, been a gardener nearly all my life since some of my earliest chores related to earning  my childhood allowance were garden- (or weed-) oriented. I also studied at New York Botanical Garden, became a Master Gardener trained in Connecticut decades ago, and worked at Oliver Nurseries in the Alpine and Perennial plants department under Priscilla Galpin Twombly. I have come to learn just how much I love teaching others, and how very much I want this to become a central part of what I do.  Face it, growing a whole bunch of flowers (45,000 or so) can become a bit isolating. As much as I love putting flowers in people's hands, I even more love putting knowledge at their fingertips. I also realize it is critical that I find a bit more balance in my life by doing non-farm activities as well as flower-growing. So, this year, I am greatly expanding my workshop offerings. I am also reaching out to groups to provide speaking engagements, and I can't wait to meet so many more gardening and plant fanatics as a result. I will be growing flowers, OF COURSE, but am actually downsizing a bit the amount I grow. I am looking to add to the number of varieties I grow, again, rather than reduce the number of varieties. One of my reasons for doing this is I wish to demonstrate to home gardeners that they, too, can grow a number of flowers for cuts and arrangements, which they likely believed they could not grow. Well, I want them to grow them. Because they can! 

As a result of this one shift in personal and business planning, some of my offseason has been spent updating and fine tuning my course syllabi, as it were, and associated handouts and powerpoint presentations for a host of new presentations and workshops. Boy, has it been both fun and rewarding.  At my age (not old but not young) I reap great joy out of helping others. I am super excited to see how many more people I can reach in my quest to share my gardening wisdom as well as flowers themselves. I am especially interested in working cutting gardens, pollinator-friendly gardens,  and earth-friendly gardens, into others' home landscapes and raising awareness of their value. In the floral design area, I am going to work very hard to hand DIYers the tools to put together most or all of their wedding flowers, and to help others acquire design skills to put great-looking centerpieces on their tables and throughout their homes.  Together we will all grow.

In the next few blog posts I will share more about my other winter revelations and where they will be taking Butternut Gardens and me in the upcoming season and beyond.

For now, Happy Gardening All!

TURNING OVER A NEW LEAF - JOIN ME!

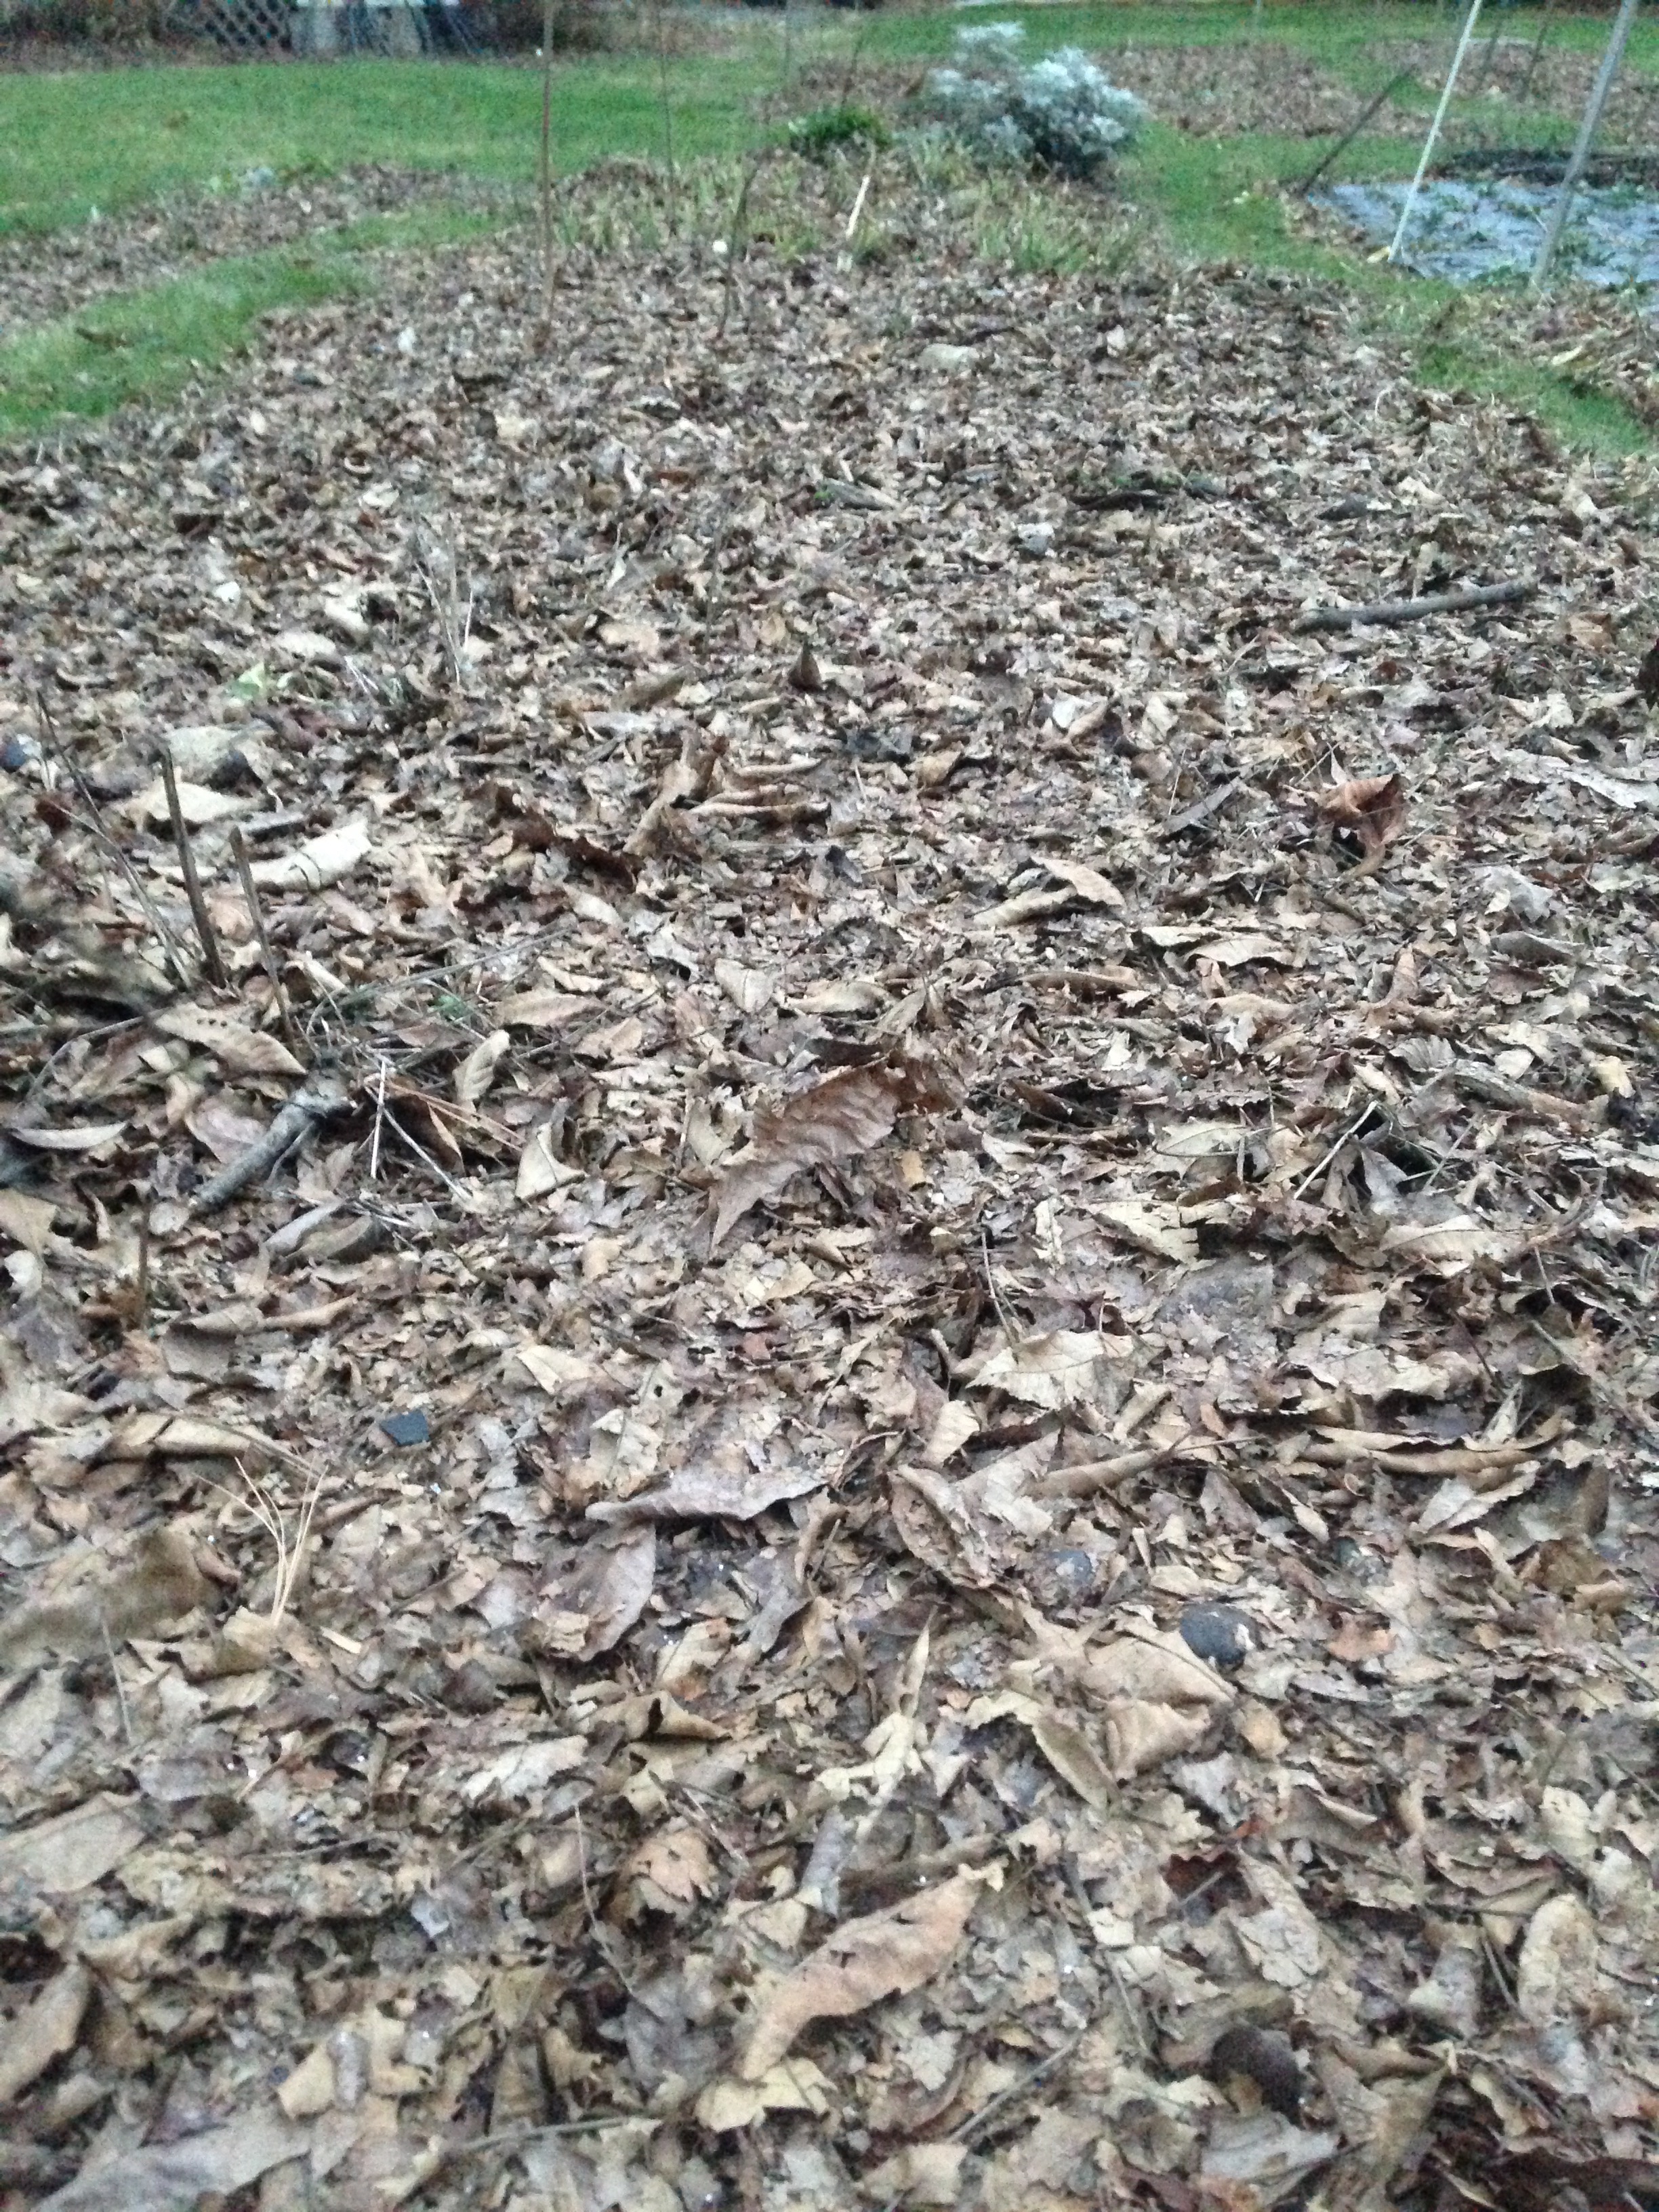
Chopped leaves forming a mulch for perennial beds at Butternut Gardens. Shagbark hickory is a main contributor, hence hickory nut hulls are part of the mix in this area of the farm.

Chopped leaves forming a mulch for perennial beds at Butternut Gardens. Shagbark hickory is a main contributor, hence hickory nut hulls are part of the mix in this area of the farm.

I live and farm in a suburban area where “lawn-scaping” is a major part of the surrounding neighborhood’s landscaping. That being said, come this time of year, the number of leaves, which falls astounds me. Other than the few that scoot into the inner confines of foundation plantings, most leaves are carted out of the neighborhood, and out of surrounding neighborhoods, to be deposited in the composting area of the town dump. There they are mixed with wood chips, grass clipping, and other ingredients, to create future mulch and compost mixtures. I grew up on 30 plus acres of beautiful property. Leaf storage was never a problem, and my family enjoyed many turns on the lawn mower naturally chopping up and mulching leaves on our lawn back into the ground.  Although I yearn for a larger parcel again, here I farm on my suburban lots making the best of every inch.  For a number of years, I too, having limited space for leaf storage, moved many leaves offsite. This year, I changed my ways, and I have to say, I am nearly giddy with this change. This year just about all of my leaves stayed right here for current and future use. To handle this year’s garden cleanup I implemented a four-step system using common homeowner equipment. I desperately want to share this methodology with you because I KNOW there are many others like me whose land and gardens could benefit from saving their leaves. 

My go-to equipment for keeping my leaves on site: weed whacker, leaf blower, and hand mower.

My go-to equipment for keeping my leaves on site: weed whacker, leaf blower, and hand mower.

My first step of leaf clean up was to cut down leftover plant stems with my weed eater and create two separate piles of clippings. Stems from Phlox or other plants, which had any sort of mildew or unwanted disease condition were piled for removal. These I do not wish to retain on site. Stems in “clean” condition are being kept on site to be incorporated into future compost.  Using a weed eater with a metal cutting edge, rather than a string type trimmer, allowed me to easily cut thicker stems of perennials, such as Baptisia, Asters, and Peonies with one easy walk down the aisles.  I may very well do a second run down the aisles with hand clippers a bit later this season to remove any stem material closer to the plant crowns. 

With beds cleared of plant stems, I started up the leaf blower, gently steering leaves out of the beds and onto the grass pathways between the flowerbeds and onto the lawn more generally surrounding the beds. I also corralled leaves into a large pile on my paved driveway and into a couple of piles on site.

Leaf mulch on perennial bed.

Leaf mulch on perennial bed.

Step three was to bring out the hand mower. By making repeated sweeps over the leaves in between the rows and also in a couple of piles, including the pile on the driveway, I soon created a much more compact and manageable leaf situation.  For step four I brought the leaf blower back to life.  For a second time I walked through the grass pathways between the garden beds, and with a very, very gentle touch, I blew some of the shredded leaves back into the beds, and left some on the grass. From the larger piles of shredded leaves, I carted wheelbarrows full to layer on top of some of the garden beds. Most exciting to me, I still have some good size piles of shredded leaves, which I will combine with all of the green cuttings I have during next year’s growing season, to help build next year’s compost. To this mixture I will also add the stems from the plants that I cut in step one, once I shred them, either with my lawnmower or small chipper. 

So, why did I bother to do all of this?  To me, leaves are like the magic of this world.  It NEVER made sense to me to remove bio-product, only to add bio-product in the form of mulch carted in during the spring.  Granted, my flower harvesting removes a certain amount of plant material, and thus requires some periodic amendment, but the gardens will be much closer to self-sufficient if I keep what grows here right where it belongs.  In the wooded areas of my childhood property, tree leaves fell and stayed. New trees grew and flourished with no fertilizers added. The system worked well! 

A leaf is a gold mine to my plants. Just think about it: a tree’s roots go a lot deeper into the soil than I could ever dig or “double dig” and all the minerals available to those roots have become available to the leaves, which are now sitting within range of the roots of Butternut Gardens’ future flowering plants. Yahoo! Another gain?  Mycohrhizae.  These root fungi, found in the soil, in leaf mould (partially decomposed leaves) and, hopefully, on my plants’ roots, are extremely beneficial to my plants. In undisturbed soils, these mycorhizzae send out stringy white runners for, in some cases, miles if the soil is not disturbed! This lets plants take up soil nutrients from a far greater area than they can take up in the limited areas in which their roots grow. In this plant/mycorhyzzae relationship, plants give a considerable amount of its manufactured carbohydrates to  mycorhizzae as a source of energy.  As leaves decompose, you may very well find white stringy material, which is part of the mycorhizzal system. Next year, as I noted above, I will attempt to incorporate some ofmy leftover leaves into various compost mixtures, which will find their ways to more of my annual plantings.

Mulched leaves, and some which blew into my leaf mulch pile, and are not chopped up, showing fungal activity (white ares) starting to decompose the leaves. This leaf mould stage is one step in the decomposition process and is particularly beneficial…

Mulched leaves, and some which blew into my leaf mulch pile, and are not chopped up, showing fungal activity (white ares) starting to decompose the leaves. This leaf mould stage is one step in the decomposition process and is particularly beneficial to perennial plants, shrubs and trees.

Over the years, I have amended my soil with products brought in from offsite, and I might still have to do this a bit, but I can’t wait to see how fertile and fluffy my leaf-amended soil will be come spring, and I feel so great about knowing exactly what is going into my soil and having absolutely no fear that the amendments might contain residues I do not want in the gardens.  I hope you will consider saving your leaves next year and following my 4 easy steps for keeping leaves on site and helping your garden plants. Just remember to please wear eye protection/safety glasses, keep children, pets and other adults completely out of the way when you are using the noted machinery, and to wear ear protection.

Compost, resulting from decomposition of organic material - leaves, grass, plant stems, kitchen waste, and more, is the next step for decomposing leaves, and a great soil amendment. I am saving piles of chopped up leaves for next spring and summer, …

Compost, resulting from decomposition of organic material - leaves, grass, plant stems, kitchen waste, and more, is the next step for decomposing leaves, and a great soil amendment. I am saving piles of chopped up leaves for next spring and summer, so I can mix it with more green material and create valuable compost.

Compost Addition 3 copy.jpg

A compost/mulched product being incorporated into a new row.

LIVING IN, AND LOVING, THE OUTDOOR WORLD

A crow soars overhead. This is not one of the "blackbirds" which this post discusses at its onstart.

A crow soars overhead. This is not one of the "blackbirds" which this post discusses at its onstart.

As I walked the garden rows, I suddenly saw in the sky what looked like leaves, swirling with the wind currents, swiftly falling and then just as swiftly being swept up before yielding again to a downward spiral in what I assumed to be their one magic “mass migration” from tree branch and twig to the awaiting ground. They were not leaves. In an instant the flock of black birds aligned itself so perfectly into a single coordinated pattern of flight. In another instant the group swooped down, turned wings sideways to soar upward again, and then with a more chaotic flap of landing wings settled onto the outstretched branches, now bare of leaves, of the shagbark hickory. With wings folded down, the noise commenced. Nearly piercing and yet, at the same time, with so many individuals contributing, it seemed more like a conglomerated humming. A background sound filling the sky. Chatter. Chatter. Chatter. I could only listen, deaf to its meaning, but knowing it surely meant something.


As I garden and farm I slip into the outdoor world daily. So often I must simply watch as an ignorant, but interested, bystander. I lament the times my work forces me to make a big impression on the soil and plants, when I must pull out old plants, which harbor insects or seeds, or when I must dig to plant, and disturb a toad’s familiar territory. I want so desperately to fit in and to not destroy. I find it such a difficult position in which to be, simply by being human.  Every day I try my best to be a good steward of our land and natural resources – animals, insects, plants, soil flora and fauna, water, air and mineral sources alike. It is my goal, always, to softly fold into the gentle arms of this earth, and leave a kiss, because, truly, I love that it shares so much with me every time I step outside.

AUTUMN ARRANGEMENTS AND WORKSHOPS

IMG_2807.jpg

Autumn offers such a spectacular variety of blooms, greens and fruits for arrangements.

Rose hips, grasses, goldenrod all give an autumn thrill to the season's design work. Photo Pat Feher.

Rose hips, grasses, goldenrod all give an autumn thrill to the season's design work. Photo Pat Feher.

Fall workshops are special, indeed. Who wouldn’t want to put together floral designs starring dahlias and so many wonderful autumn specialties?

Rose hips are one of my favorite autumn additions.  They give such a nice airy look, and carry so much the feel of autumn with their striking orange-red berries and loose sprays. Several years ago I purchased some rose plants known for producing nice rose hips – fruit of the rose plant, that holds the seeds. As it turns out, my favorite hips come not from those plants, but from Rosa multiflora (multiflora rose), which seems native because you find it everywhere, but is, in fact, an invasive from Eastern Asia. Because of its reach, it is listed as invasive/banned by the State of Connecticut. I do my share of weeding and/or mowing to eradicate this plant in many locations around my home and gardens. I doubt it will ever by eradicated, sort of like Barberry, which is so widespread as to seem native, but is another Asian plant introduced to Europe and then introduced (and escaped) to the this continent in the 1600’s. Just look for white flowering rose “bushes” along roadsides and field edges throughout the summer and you will see exactly how invasive the Multiflora Rose plant has become.  


This is the time of year when ornamental kales can also take a prominent position in garden-styled arrangements. They nicely cover both sides of the divide between foliage and flower, offering floral color and greenery. For loose and airy additions, go no farther than some of our Solidagos (goldenrods) and asters. I gladly cultivate a number of our native Solidagos and asters for a succession of bloom – each in its own time. One little gem has the most precious small white flowers and delicate branching, and has become my September go-to every year. No, I haven’t bothered to look up its scientific name, sorry. It’s such fun to work into bouquets as a finishing touch.  These, and other accents during other months of the growing season, truly shine and give a garden-inspired centerpiece its full beauty.

All types of grasses and grains are available for autumn design work - perfect for giving your centerpieces the seasonal touch.

All types of grasses and grains are available for autumn design work - perfect for giving your centerpieces the seasonal touch.

Water Wisely


In a summer in which we are experiencing less than usual rainfall, I want to take a few moments to share some thoughts on watering. Butternut Gardens is located in a suburban neighborhood. Lawn and landscape irrigation systems abound and we have purchased water supply. I, too, have a lawn and landscape irrigation system in place on my home growing site, but not on my other growing site. The home irrigation system is rarely used here. In fact, I have used it only 3 times this growing season when plants looked truly in need. It might be because I grew up using a well that I treat water with a huge bit of respect. It might be my instinctively frugal nature that makes me appreciate a lot of the things many take for granted. Then again, it might be that I was a child of parents who lived through war years, which included rationing for the common good and I still believe in assisting the common good. Or it could be that as a child I watched reservoir levels hit highs and lows and I watched a river, which flowed by our house, too, reach floodwater highs and trickling lows. Just because it comes from a faucet doesn’t mean it doesn’t come from SOMEWHERE.

Straw mulch goes over certain newly-transplanted seedlings to help reduce watering need. White frost cover sits atop another row, also helping to reduce water strain on new transplants.

Straw mulch goes over certain newly-transplanted seedlings to help reduce watering need. White frost cover sits atop another row, also helping to reduce water strain on new transplants.


In my mind, water is precious. While my plants are certainly important I generally confine my outdoor watering of plants to the following situations.  First, when I plant seedlings into the garden rows, I water. It is important to have soil, water and plant roots make contact rather than have plant roots in contact with air, which makes up part of the soil complex. Water helps settle the soil and allows for this contact. During the first few weeks after transplant I am very vigilant when it comes to protecting the seedlings from drying out. At this stage they are quite prone to drying out since their root system is still developing, and not very deep into the ground,  and first leaves are very tender. So, during this very sensitive timeframe I usually water very gently to keep the soil moist. I also take a few other steps to reduce watering needs. The first is I try to time planting to coincide with an imminent rain, but not a heavy rain, which would do more harm than good. I also routinely cover my newly planted out seedlings with white frost cover fabric. This fabric is great for keeping critters from eating seedlings or un-sprouted seeds (if I have placed multiple seeds in each plug) and also is invaluable at moderating soil temperature changes and soil moisture changes. I highly recommend this step when you plant out home seedlings.  In addition, I am a mulch fanatic both for weed control and for the sake of keeping my soil moist. 

Spot watering of plants, which exhibit greater water stress is one of my watering techniques.

Spot watering of plants, which exhibit greater water stress is one of my watering techniques.

A second instance in which I will water is if we have not had rain for weeks on end and plants are in heavy growing stages. You may recall that we did not have water for 23 days straight earlier this season. We have had little water throughout this summer and are now about 9 inches below average for the year to date. I have not raced out to water. My mulches are doing a fantastic job in general. This has allowed me to water a total of three times on any large scale this year. I can’t say enough good things about mulching. One thing that helps me as a flower farmer, as opposed to strictly a gardener, is that I usually plant my plants closer to one another than I would in a garden setting. I want the plants to stretch out a bit to give me longer stems and I do a lot of cutting, which takes out volume and width. With a closer spacing of plants each individual plant benefits from a bit of shading around soil level.


Spot watering is a third category in my watering regimen. Certain plants, such as hydrangea, tend to wilt faster than others. If they are looking dry and wilted, I will water slowly and deeply. 

Finally, to help prolong the vase life of my cut flowers, I will pay special attention to plants from which I will soon be cutting.  A well-hydrated flower on a plant seems to make a better cut off the plant. So, if I am looking to cut Rudbeckia in another two days, or the Sweet Williams are almost ready, I will make sure they are well hydrated and will consider watering within 24 hours of cutting if they warrant it.

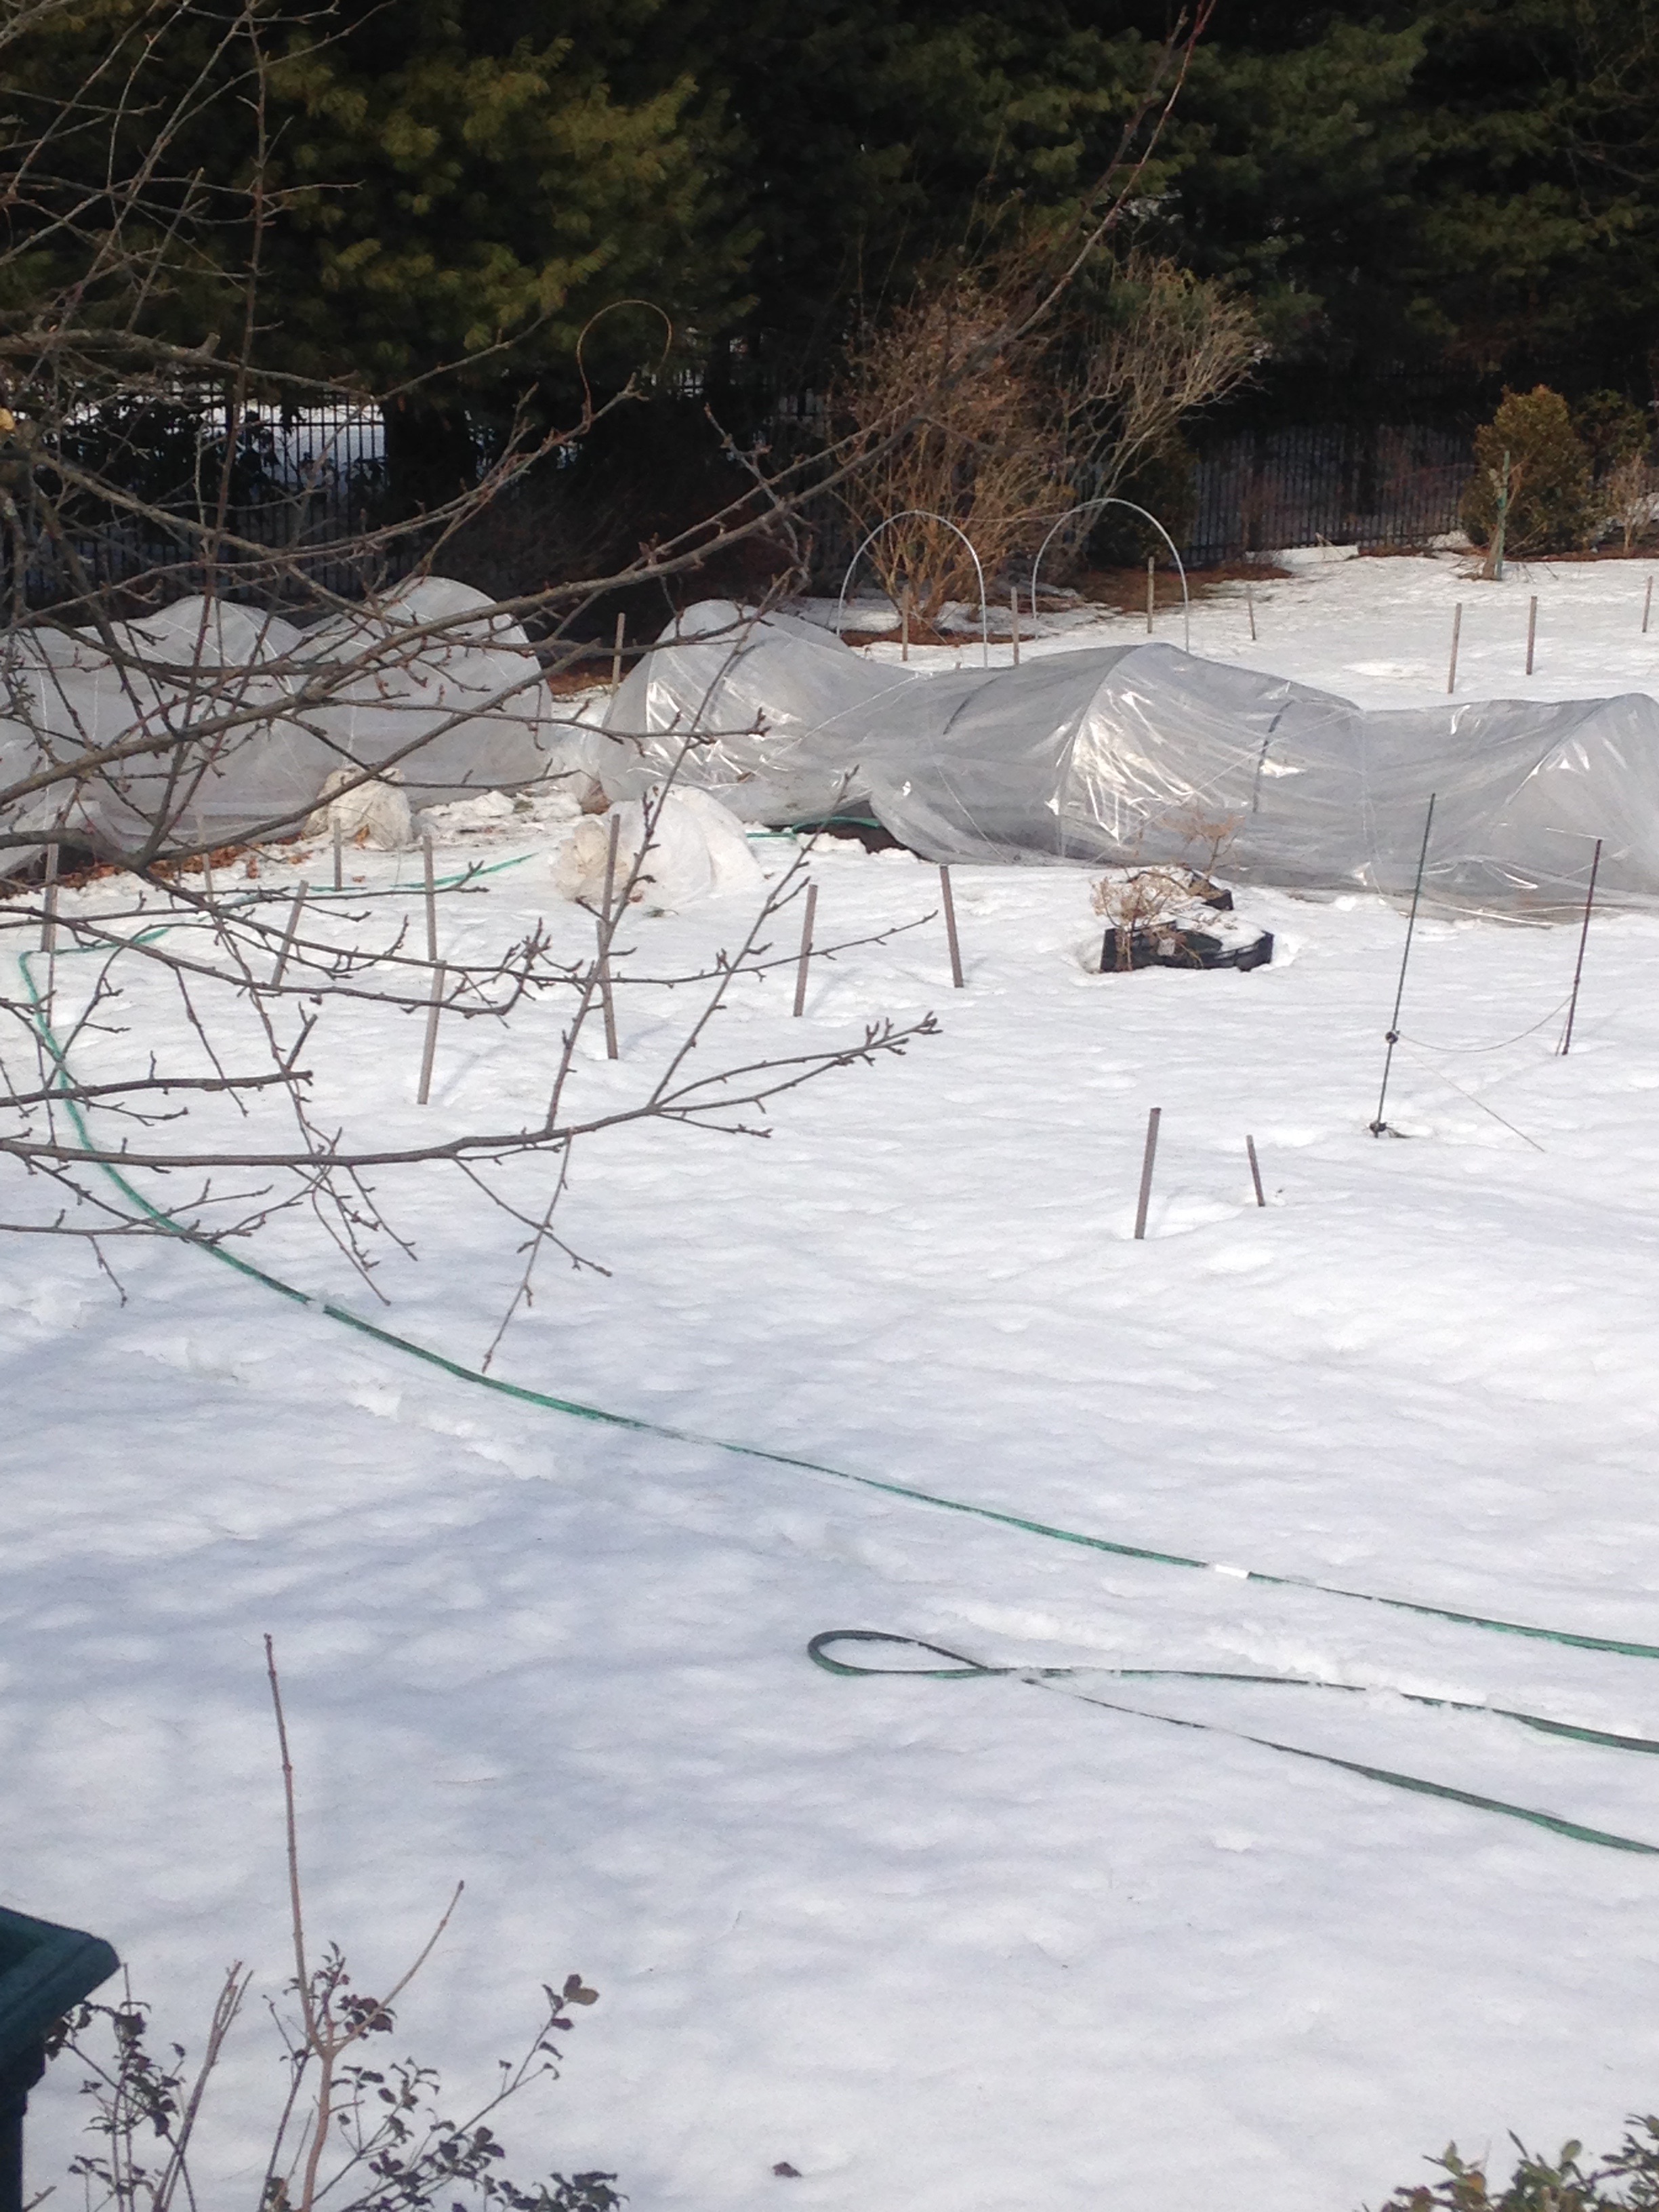
Sometimes bringing out the hose is a winter task to keep the lovelies in the low tunnels well hydrated. Temperatures can climb quickly, even with sides slightly raised to vent.

Sometimes bringing out the hose is a winter task to keep the lovelies in the low tunnels well hydrated. Temperatures can climb quickly, even with sides slightly raised to vent.


If I grew more plants in high tunnels or low tunnels I would have to supply water in this situation as well because rainwater doesn’t make it through the plastic.  This is actually one reason I like to field grow my plants. I live in an area, which generally has plenty of water for outdoor growing. For this I am thankful. When I grow anemone and ranunculus in low tunnels I do have to supply water, sometimes even in the winter because the plastic tunnels keep the soil warm enough for the plants to continue growing, but also keep the soil dry. Other farmers have suggested kicking snow in from the sides of the tunnels. Even with last year’s extensive and extended snow cover I preferred to haul out the hose. No, it wasn’t fun, but I didn’t have to do it too many times. The miserable part is hauling the hose back in over the snow and making sure it is clear of water, which could freeze. So, if you think you want to be a flower farmer, just imagine hauling a hose out and back to the faucet in cold winter weather.

DIY WEDDING FLOWERS

I created these softly-colored summer bouquets for a wonderful wedding couple, who decided to do the rest of their wedding flowers themselves using Butternut Gardens flowers.

I created these softly-colored summer bouquets for a wonderful wedding couple, who decided to do the rest of their wedding flowers themselves using Butternut Gardens flowers.

Whether prompted by budget, by the desire to play a greater hand in wedding day design, or other personal reasons, I have been working with an increasing number of brides looking for DIY wedding flowers.  I have to say, I absolutely love it. I welcome all interested in DIY to contact me. In some cases “all” I do is supply the flowers, and the brides or wedding couples, with their families and wedding party, do all flowers from centerpieces to bouquets, boutonnières and ceremony pieces. I say, “all” I do is supply the flowers, but, in truth, quite a bit of planning on my part goes into the selection of a satisfying mix and number of blooms and greens and into conversations with my brides to educate on flower types, availability and design needs. For other weddings, I am entrusted with creating the bouquets and other wear and carry flowers, which will be most photographed, while supplying fresh blooms and greens for DIY table designs.

One of the reasons I find the DIY relationship so satisfying is I know the personal effort put forth by others in creating their floral designs is going to make them enjoy their flowers that much more. From personal experience, I know how absolutely fabulous it feels to share flowers with others. DIYers get to do just this – share their flowers - as well as learn more about their very personal flowers, take great pride in their creations and have a shared design experience to be remembered.  It is fabulous.

Next year I plan on offering several workshops especially for DIYers. I know, from my many, many  conversations to date, that DIYers are eager to take on floral design, but have quite a few of the same questions about how best to go about doing this.  I want to help with flower planning, budgeting and design.  So, please check back for my DIY wedding workshops starting in Spring of 2016.

MULCH YOUR GARDENS. IT REALLY HELPS.

Mulch is a gardener’s best friend, sitting right up their with massage therapy following a long weekend in the garden! I can’t stand seeing bare soil in a garden. It drives me crazy. So, all season I do my best to keep every plant tucked into some sort of mulch.

Even "evergreen" pine trees drop needles each year. Here is a terrific example of a natural winter mulch, which will overwinter right where the trees need it most.

Even "evergreen" pine trees drop needles each year. Here is a terrific example of a natural winter mulch, which will overwinter right where the trees need it most.

Why am I so adamant about mulch? Let me count the reasons, as they say. In the winter and early spring it helps moderate soil temperature and does a great job reducing frost heave of perennials overwintering, particularly ones recently planted the previous fall, and does the same for hardy annuals, plants so critical to the spring bouquets. In the summer it also acts to moderate soil temperature extremes and helps the soil to retain moisture from the surface on down. Given the seeming increase in pounding rains we are receiving (when we actually receive rain, that is) I am happy to have a layer of mulch protecting the soil and plants from resulting pit marks and helping reduce runoff and soil erosion. I like adding a coating of mulch, which can slowly break down and amend the soil with nutrients and improve the porosity of soil to enable better water and airflow within it.  Finally, mulch does wonders for weed control, which saves you time when it comes to garden maintenance.

Pine bark mulch covering perennial beds with foxglove in foreground. Peonies are completely covered for the winter. Bed in background has covered Astilbes. All of these plants are deer resistant, hence are not fenced in.

Pine bark mulch covering perennial beds with foxglove in foreground. Peonies are completely covered for the winter. Bed in background has covered Astilbes. All of these plants are deer resistant, hence are not fenced in.

Before I started gardening on such a large scale, a.k.a. flower farming, my go-to mulch was always pine bark in small size chips. I liked the bagged material, even though it cost more, and I liked the bark pieces rather than the shredded. It broke down slowly, had a color I liked, was generally a uniform product, and my plants grew well. Cost per bed foot (4-foot wide beds) was about 50 cents. Although it breaks down over time, the bark mulch does last more than one year.

Mulching on a large scale has become an unwanted expense, but I refuse to grow without it. So over the years, I have tried quite a few options. I'll share my thoughts with you in hopes that you will NEVER consider growing without using some sort of mulch. In fact, I hope you will consider a nice topdressing of mulch if you lose some during fall leaf clean up. Mulch in the winter, in my mind, is as valuable as mulch during the active growing season.

Weed barrier mulch blends in well when wet. I use this for perennials, but this was a trial for annuals, using variable spacing.

Weed barrier mulch blends in well when wet. I use this for perennials, but this was a trial for annuals, using variable spacing.

For perennials, which stay in the ground year-round and year to year, I still like to add some pine bark mulch or chopped leaves so as to add organic material to the soil, in addition to the compost tea I regularly add. In some of the perennial beds I am trying two different types of paper product this season, and both are working well. The first, and least expensive, is brown Kraft-type paper, which comes in rolls and cost about 10 cents a bed-foot in my 4-foot wide beds. The second is a thicker rolled paper product, which is marketed as a paper weed barrier. Its cost was about 36 cents a bed-foot (4 foot wide rows) and it is made of cellulose fibers and no petrochemicals. For both of these I cut holes into the paper using either scissors or box cutter early in the spring, before the perennials put out much growth, so as to surround the plants with paper, and cover the area in between plants. Both products are holding up well, but look to be capable of breaking down by season's end, or certainly by next spring, which is exactly what I want. For a small garden, I would prefer the second type of paper as it seems to hold moisture better than the thinner brown type paper and is a bit heavier, which makes it less prone to blowing with wind. For both products I weighted down the edges with soil and a few small rocks. For perennials I want this type of mulch to break down by year end and to be able to be incorporated into the soil so that I can have access to the soil for annual amending. For compost tea applications, which would normally go onto the leaves and soil, I am spraying onto the hole in the paper immediately surrounding the plant so that the soil also receives regular compost tea application. Removing paper at season's end, by having it decompose, eliminates a welcome winter cover for voles and moles, which feed on plant roots, among other things.

Woven landscape fabric allows for water and air passage.

Woven landscape fabric allows for water and air passage.

For annuals, I am finding both papers to be working well, as they are for perennials, and I recommend either for a small cutting garden or vegetable garden. For a larger scale, and to reduce time, I prefer to use black landscape fabric (woven) into which I burned holes with my small flame torch. The holes allowed for even spacing. The material allows for water and air flow through it.Weeds are covered out in most areas, but weed seeds can, and do, sprout if they are in the same location as one of the planting holes. For certain crops, I added straw and/or salt hay on top of the black fabric at certain times to reduce the soil temperature. Even though creating the holes initially is time-intensive, I expect to gain a number of years out of each fabric piece, and I will bring them inside at season's end to prolong usability.

Straw covering newly-planted seedlings.

Straw covering newly-planted seedlings.

Also for annuals, I have used straw or salt hay (not regular hay) after planting. Both have worked well as mulch, and they are lighter and easier to spread than the bark chips. A bale of straw or salt hay goes a long ways, bringing the cost to about 12 cents a bed foot (4 feet wide) which is less than the bed-foot cost of the wood chips. One drawback is I am finding both materials more prone to drying out than my reliable pine bark chips. These two materials will remain in my mulch repertoire when I put a lot of new annual seedlings into the ground. The are light in weight and seedlings grow nicely through them. Pine needles are abundant adjacent to part of my growing area and actually look quite nice as a mulch. I don’t personally like working around the pointed needles, but they are available, so I use them in some of my perennial growing areas. 

Plastic is a type of mulch I have not yet used, even though it is a staple of many farms. I do not want any more plastic than necessary floating around the beds, or having to be disposed of.  Four years ago I tried an organic corn starch-based “plastic” type material. It is said to decompose into the soil and is, as mentioned, organic. I am personally not sold on the product, even though it works very well for others and might be worth your trying. I might try it again. My problem with it is I find, even this year, pieces of the product still in my soil, not yet broken down as I expected.  This was a disappointment. Also, I put transplants into the ground by hand, as other gardeners might, rather than with a mechanical transplanter. Creating holes in this type of product proved more time consuming than I wanted. Having said this, for a small garden, I would definitely prefer to use this product than to use plastic. Like plastic, these plant-based “bioplastics” prevent air and water from passing through, so a drip type water system should be employed. 

A neat product, which I have s seen in action, but have not yet used, is called Flora-Flow ©.  It is a plastic product, which not only serves as mulch, but also has irrigation drip tape attached to its underside. With a simple connection to your garden hose you achieve mulch and water system all in one. Planting holes can be created in pre-marked, partially perforated locations. This might be a trial product for me for next year. Other flower farmers use it and like it, but on my growing scale, I must always consider costs. FloraFlow has a recycling partner so, even though the product is a plastic product, it is said to be recyclable

Lady's Mantle with chopped leaves, pine needles and pine bark mulch (along with some unchopped leaves, which have blown into the garden).

Lady's Mantle with chopped leaves, pine needles and pine bark mulch (along with some unchopped leaves, which have blown into the garden).


Leaves, or rather chopped leaves, will become an increasingly greater-used garden mulch around the farm. The benefits of leaf material are huge and leaves are generally abundant and, happily, free. I intend to write at greater length about my leaf plans later this year, so check back in. In my mind, leaves are magic!